Understanding Angular lifecycle methods with Examples
In Angular, components have a lifecycle managed by Angular itself, from creation to destruction. Angular provides lifecycle methods that you can use to tap into this process and perform custom logic at specific points in the lifecycle.
Here are some examples of how you might use each lifecycle method:
ngOnChanges: This method is called whenever a bound input property changes. You can use it to react to changes in input properties and perform logic when the value of an input property changes.
|
1 2 3 4 5 6 7 8 9 10 11 12 13 |
import { Component, Input, OnChanges } from '@angular/core'; @Component({ selector: 'app-counter', template: '<p>{{counter}}</p>' }) export class CounterComponent implements OnChanges { @Input() counter: number; ngOnChanges(changes: SimpleChanges) { console.log(changes); } } |
In this example, the CounterComponent implements the ngOnChanges method and logs the changes to its input properties.
ngOnInit: This method is called after the firstngOnChangescall and is used to perform initialization logic for the component.
|
1 2 3 4 5 6 7 8 9 10 11 12 13 |
import { Component, OnInit } from '@angular/core'; @Component({ selector: 'app-hello', template: '<p>Hello, {{name}}!</p>' }) export class HelloComponent implements OnInit { name: string; ngOnInit() { this.name = 'Angular'; } } |
In this example, the HelloComponent implements the ngOnInit method and initializes its name property.
ngDoCheck: This method is called during every Angular change detection cycle and is used to perform custom change detection.
|
1 2 3 4 5 6 7 8 9 10 11 12 13 14 15 16 17 18 |
import { Component, DoCheck } from '@angular/core'; @Component({ selector: 'app-todo-list', template: ` <ul> <li *ngFor="let item of items">{{item}}</li> </ul> ` }) export class TodoListComponent implements DoCheck { items: string[]; ngDoCheck() { console.log(this.items); } } |
In this example, the TodoListComponent implements the ngDoCheck method and logs its items array.
ngAfterContentInit: This method is called after the component’s content has been fully initialized.
|
1 2 3 4 5 6 7 8 9 10 11 12 13 14 |
import { Component, AfterContentInit } from '@angular/core'; @Component({ selector: 'app-tabs', template: ` <ng-content></ng-content> ` }) export class TabsComponent implements AfterContentInit { ngAfterContentInit() { console.log('Tabs content initialized'); } } |
In this example, the TabsComponent implements the ngAfterContentInit method and logs a message to the console.
ngAfterContentChecked: This method is called after every change detection cycle that updates the component’s content. It can be used to perform logic that depends on the component’s content being fully updated and checked.
|
1 2 3 4 5 6 7 8 9 10 11 12 13 |
import { Component, AfterContentChecked } from '@angular/core'; @Component({ selector: 'app-tabs', template: ` <ng-content></ng-content> ` }) export class TabsComponent implements AfterContentChecked { ngAfterContentChecked() { console.log('Tabs content checked'); } } |
In this example, the TabsComponent implements the ngAfterContentChecked method and logs a message to the console.
6. ngAfterViewInit: This method is called after the component’s view (including its child views) has been fully initialized.
|
1 2 3 4 5 6 7 8 9 10 11 12 13 14 |
import { Component, AfterViewInit } from '@angular/core'; @Component({ selector: 'app-tab-panel', template: ` <ng-content></ng-content> ` }) export class TabPanelComponent implements AfterViewInit { ngAfterViewInit() { console.log('Tab panel view initialized'); } } |
In this example, the TabPanelComponent implements the ngAfterViewInit method and logs a message to the console.
7. ngAfterViewChecked: This method is called after every change detection cycle that updates the component’s view (including its child views).
|
1 2 3 4 5 6 7 8 9 10 11 12 13 14 |
import { Component, AfterViewChecked } from '@angular/core'; @Component({ selector: 'app-tab-list', template: ` <ng-content></ng-content> ` }) export class TabListComponent implements AfterViewChecked { ngAfterViewChecked() { console.log('Tab list view checked'); } } |
In this example, the TabListComponent implements the ngAfterViewChecked method and logs a message to the console.
8. ngOnDestroy: This method is called just before the component is destroyed by Angular. It can be used to perform cleanup logic for the component, such as unsubscribing from observables or detaching event handlers.
|
1 2 3 4 5 6 7 8 9 10 11 12 13 14 15 16 17 18 19 20 |
import { Component, OnDestroy } from '@angular/core'; @Component({ selector: 'app-timer', template: '<p>{{time}}</p>' }) export class TimerComponent implements OnDestroy { time: number; intervalId: number; ngOnInit() { this.intervalId = setInterval(() => { this.time = Date.now(); }, 1000); } ngOnDestroy() { clearInterval(this.intervalId); } } |
In this example, the TimerComponent implements the ngOnDestroy method and uses it to stop the interval timer it started in its ngOnInit method.
I hope you found this article useful and informative. Thanks 😊
Creating a Vue.JS Instance Using its Fundamental Concepts
Vue.js is simple and powerful, and it is easy to learn. Once you understand the basics of the framework, everything will work in just the way you expect. The framework will help you to keep focused on writing the logic of your application instead of remembering a bunch of APIs that are hard to use. This article will help you learn some of the fundamental concepts in Vue.js.
Fundamental concepts
When you start a Vue application, what you need to keep in mind is your application’s logic itself. You don’t need to remember a set of APIs so that you can connect different pieces of your code. Vue.js, which is a progressive framework, provides you with an intuitive way of writing web applications, starting small and growing incrementally into a large-scale application. If you have used other frameworks before, you may wonder why they make things unnecessarily complicated. Now, let’s go through fundamental concepts in Vue.js and create a sample application. You can also access the complete code for this article at https://github.com/PacktPublishing/Building-Applications-with-Spring-5-and-Vue.js-2/tree/master/Chapter02/MessagesApp.
Creating a Vue instance
Creating a Vue
instance is the start of every Vue.js application. Typically, a Vue application
consists of two types of Vue instance—the root Vue instance and component
instances. You create the root instance with the Vue function, as follows:
|
1 |
new Vue({/* options */}); |
The options object here is where you describe
your application. Vue.js takes this object and initializes the Vue instance. Let’s
create a simple application, called the Messages App and see how to use
the options object.
This SPA has the following features:
- Add a message
- View messages list
- Delete a message
- Automatically disable the add feature under certain conditions
We will start by creating the index.html file and, from there; we will build our application incrementally. Let’s have a look at the index.html file:
|
1 2 3 4 5 6 7 8 9 10 11 12 13 |
1.<!DOCTYPE html> 2.<html> 3.<head><title>Messages App</title></head> 4.<body> 5.<div id="app"></div> 6.<a href="https://unpkg.com/vue@2.5.13/dist/vue.js">https://unpkg.com/vue@2.5.13/dist/vue.js</a> 7. 8.let vm = new Vue({ 9.el: '#app' 10. }); 11. 12. </body> 13. </html> |
In line Now, let’s define
our data model of the application. We need an array to hold those added
messages and a string to bind to the form’s input which will accept new
messages. Here is how the We add the Besides using a
plain object as the value of the Using a function
is required when you define the data structure for a component because, in that
way, Vue.js will always create a fresh data model for the new component. If you
use a plain object to define a component’s data model, all of the
instances of that component will share the same For now, we have
only defined the data model, and we haven’t told Vue.js what to do with
the The second way is to put the template directly inside the mounting point, In line In line In line In line In line Here is how the The However, you
should not use arrow functions syntax to create methods because you will lose
access to the Vue instance via Inside the Now, let’s add a way to delete a message from the UI. Here is what we change in the template: We add a button and use We delete the
selected message from the Now, let’s add the ability to automatically disable the What if we want
to change the logic so that the Here, we can use As you can see, the As you can see,
our template becomes much easier to follow and maintain since you keep most of
the logic in the JavaScript rather than in the HTML template. For the By now, we have implemented all of the features of the Messages App. Since we didn’t use Besides the By now, you’ve
learned how to use the Now, let’s
open the Apart from
the If you found this
article interesting, you can explore Building Applications with Spring 5 and
Vue.js 2 to Become efficient in
both frontend and backend web development with Spring and Vue. With the help of
Building Applications with Spring 5 and
Vue.js 2 you’ll get to grips with
Spring 5 and Vue.js 2 as you learn how to develop a web application. Blazor is a component-based framework. In that component is defined as a block of the UI, consisting of both HTML and the corresponding business logic. The HTML helps to render the component on the web page, and the logic handles the database operations or the event handling. A Blazor component is lightweight, flexible, and shareable across different projects. The bottom line
is that all UI fragments can be termed components in Blazor. We will now
discuss the following two methods for creating components in Blazor: Let’s examine
both of them in detail in this section. We will use
a single file with the Put the following lines of code inside this file: Both the HTML and the This will add
a Type the You can observe
that we have a You can observe
that the route URL of the page has In this method,
we will be using two files to create our component—one file to hold
the HTML part of the component and another to hold the logic part of the
component. To add the files,
we will follow the same process that we employed earlier. Right-click on the
Pages folder and select New File. Name the file Open Here, we have
defined a Note that the Blazor compiler generates classes for
all of the view pages with the same name as the page name; hence, we have
suffixed the class name with the word “model” to distinguish it from
the page name. If we use the same class name as page name (CodeBehindComp, in
this case), then it will result in a compile time error. Open This page will
inherit the class defined in our code-behind page by using the Add the navigation link for this page, as defined in the following snippet, inside the Execute the
application by running the Here, the title
of the page is set to The Blazor
framework also allows us to use a component within another component.
This will work like a parent-child relationship, where the parent component can
refer to the child component. We will
demonstrate this concept with the help of an example. Create two files
in the Pages folder, and name them Open the Here, we first
defined some dummy messages to be displayed on the page. There is no route
defined for this component, as it will act as a child component and will be
referred to by another component. The parent component will pass the content to
the child component so that it can be rendered in a The component
parameter must fulfill the following two criteria: Open We defined the
route of this application at the top of the preceding snippet as Before executing the code, we need to add the following navigation link of the parent component to the Run the
application and click on the You can see the
content of the parent component, along with that of the child component,
displayed on the page. If you found this
article interesting, you can explore Blazor Quick Start Guide to work with the fundamentals of Blazor to create rich and interactive
web application. Blazor Quick Start Guide introduces you to the core concepts of Blazor, and how to apply these
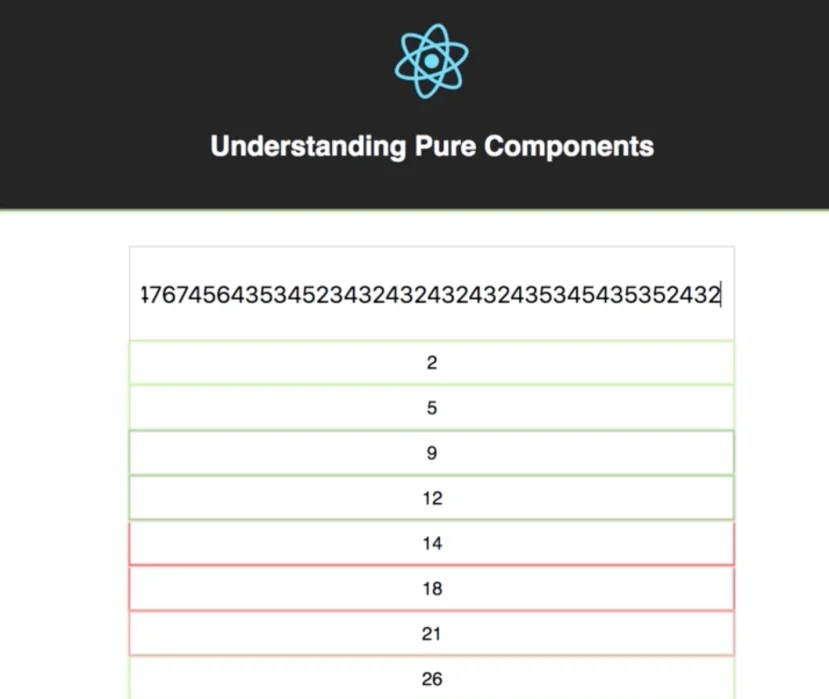
to a real-world web app with the help of Entity Framework Core and SQL Server. Many people are confused by the difference between a Functional Component and a Pure Component. Most of them think that they are the same, but this is not true. When you use a React Pure Component, We need to import PureComponent from React: If your React component’s render method is “pure” (that means it renders the same result, given the same props and state), you can use this function to improve the performance of your application. A Pure Component performs a shallow comparison for the props and nextProps objects as well as the state and nextState objects. Pure components do not include the shouldComponentUpdate(nextProps, nextState) method, and if you try to add it, you’ll get a warning from React. In this article, you’ll learn to create a basic example to understand how Pure Components works. To begin, you need to install the Chrome extension React Developer Tools to do a simple debug in your application. Download React Developer Tools from https://chrome.google.com/webstore/detail/react-developer-tools/fmkadmapgofadopljbjfkapdkoienihi. First, create your React application using create-react-app. Once that is done, you can proceed to create your first React component. Before you install create-react-app, remember that you need to download and install Node from www.nodejs.org. You can install it for Mac, Linux, and Windows. Install create-react-app globally by typing this command in your Terminal: Alternatively, you can use a shortcut: Now build your first React application by following these steps: File: src/Home.js File: src/Home.js To get started, edit File: src/App.js File: src/components/App.js File: src/components/Numbers/Numbers.js File: src/components/Numbers/Result.js File: src/components/Numbers/Numbers.css How React Pure Component works… If you run the application, you will see this: Now, inspect the application using React Developer Tools. You need to enable the Highlight Updates option: After this, start writing multiple numbers in the input (quickly), and you will see all the renders that React is performing: As you can see, React is doing a lot of renderings. When the highlights are red, it means the performance of that component is not good. Here’s when React Pure Components will help you. Migrate your Result component to be a Pure Component: File: src/components/Numbers/Result.js Now if you try to do the same with the numbers, see the difference: With the Pure Component React, you do less renders in comparison to a Class Component. Probably, you may now think that if you use a Stateless component instead of a Pure Component, the result will be the same. Unfortunately, this won’t happen. If you want to verify this, change the Result component again and convert it into a Functional Component.: File: src/components/Numbers/Result.js See what happens with the renders: As you can see, the result is the same as the Class Component. This means that using a Stateless Component will not help you improve the performance of your application all the time. If you have components that you consider are pure, consider converting them into Pure components. If you found this article interesting, you can explore Carlos Santana Roldan’s React Cookbook to be on the road to becoming a React expert. React Cookbook has over 66 hands-on recipes that cover UI development, animations, component architecture, routing, databases, testing, and debugging with React. Node.js is an event-driven, server-side JavaScript environment. Node.js runs JS using the V8 engine developed by Google for use in their Chrome web browser. Leveraging V8 allows Node.js to provide a server-side runtime environment that compiles and executes JS at lightning speeds. This article covers the Node’s module system and the different categories of the Node.js modules. Like most programming languages, Node.js uses modules as a way of organizing code. The module system allows you to organize your code, hide information, and only expose the public interface of a component using module.exports. Node.js uses the CommonJS specification for its module system: Take a look at a simple example: To call other functions such as mul and div, use object destructuring as an alternative when requiring the module, for example, const { add } = require(‘./math’);. The code files for the section The Module System are placed at Code/Lesson-1/b-module-system. You can place Node.js modules into three categories: These are modules that can be used straight away without any further installation. All you need to do is to require them. There are quite a lot of them, but here are a few that you are likely to come across when building web applications: For example, the following code reads the content of the lesson-1/temp/sample.txt file using the in-built fs module: Node Package Manager (npm) is the package manager for JavaScript and the world’s largest software registry, enabling developers to discover packages of reusable code. To install an npm package, you only need to run the npm install <package-name> command within your project directory. Here’s a simple example. If you want to use a package (library) like request in your project, you can run the following command on your Terminal, within your project directory: To use it in your code, you should require it, like any other module: More details about npm can be found at https://docs.npmjs.com/. When you run the npm install <module-name> command on your project for the first time, the node_modules folder gets created at the root of your project. It’s worth noting how Node.js goes about resolving a particular required module. For example, if a /home/tony/projects/foo.js file has a require call require(‘bar’), Node.js scans the filesystem for node_modules in the following order. The first bar.js that is found is returned as follows: Node.js looks for node_moduels/bar in the current folder followed by every parent folder until it reaches the root of the filesystem tree for the current file. Note that the module foo/index.js can be required as foo, without specifying an index and will be picked by default. Now dive a little deeper into npm, by looking at some of the handy npm commands that you will often need: You have already looked at how local modules are loaded from the previous example that had math.js and index.js. Since JavaScript Object Notation (JSON) is such an important part of the web, Node.js has fully embraced it as a data format, even locally. You can load a JSON object from the local filesystem the same way you load a JavaScript module. During the module loading sequence, whenever a file.js is not found, Node.js looks for a file.json. See the example files in lesson-1/b-module-system/1-basics/load-json.js: Here, you will notice that once required, the JSON file is transformed into a JavaScript object implicitly. Other languages will have you read the file and perhaps use a different mechanism to convert the content into a data structure such as a map, a dictionary, and so on. For local files, the extension is optional, but should there be a conflict, it might be necessary to specify the extension. If you have both a sample.js and a sample.json file in the same folder, the .js file will be picked by default; it would be prudent to specify the extension, for example const config = require(‘./config/sample.json’). When you run npm install, without specifying the module to install, npm will install the list of packages specified (under dependencies and devDependencies in the package.json file in your project). If package.json does not exist, it will give an error indicating that no such file has been found. Open the IDE and the Terminal to implement this solution and learn how to write a basic Node.js file and run it. Write a very basic mathematical library with handy mathematical functions using the following steps: The 16 and 21 values should be printed out on the Terminal. This activity will build upon the, Running Basic Node.js activity. If the argument is a single array, sum up the numbers, and if it’s more than one array, first combine the arrays into one before summing up. Use the concat() function from lodash, which is a third-party package that you need to install. Now create a new function, sumArray, which can sum up numbers from one or more arrays using the following steps: Notice that you’re adding the –save option on your command so that the package installed can be tracked in package.json. When you open the package.json file created in step 3, you will see an added dependencies key with the details. You should see 21 and 30 printed out. If you found this article interesting, you can explore Anthony Nandaa’s Beginning API Development with Node.js to learn everything you need to get up and running with cutting-edge API development using JavaScript and Node.js. Beginning API Development with Node.js begins with the basics of Node.js in the context of backend development and quickly leads you through the creation of an example client that pairs up with a fully authenticated API implementation.5, we create a app id in the DOM. And in line 9, we mount our application to this element
by using the el property of
the options object. el is short for element, and its value can be a CSS selector
string, like the one we use here, '#app', or it can be the HTMLElement itself, document.getElementById('app'). In line 8, we assign the Vue instance to the vm variable, which is short for ViewModel.
data object appears:
data object using object literals. As you
can see, it is quite straightforward. We give them initial values so that you
can easily tell that messages is an array and newMessage is a string. Providing initial
values for the data object properties is a good practice. It not
only helps you understand the data model better, but also makes those
properties reactive by default. data property of the options object, you can also use a function
that returns a plain object, as in the example:
data object, which is not desired. For
our root Vue instance here, we are safe to use a plain object.data object.
Let’s add a template for displaying and adding messages. You can add a template
in three ways. One is to add an inline template string using the template property of the options object. It is appropriate to adopt
this approach when you create a component that doesn’t have a lot of markups. . Vue.js will parse the template inside #app and replace it with HTML generated by Vue.js. The third way is to put the template markup inside a script tag, for example, <script type="x-template" id="tmplApp">, and put '#tmplApp' as the value of the template property of the options object. We will adopt the second approach here just so we can have the template markup close to the final output. Here is how the template appears:
7, we use the Vue built-inv-for directive to render
the messages list. The syntax of the v-for directive is alias in source. In our code, message is alias and messages is source. We don’t need to write vm.messages in order to access the messages property. Just use the exact name
that you put in the data object. And by adding the v-for directive to the li tag, we create a v-for block inside the li tag, and that’s where thealias message will be available. You can think of
the v-for block
as being equivalent to the for-loop block in JavaScript.8, we use Mustache syntax to output the text property and createdAt property of a message object of the messages list. The createdAt property is a Date object that we add when saving a new
message. When Vue.js parses the template and interpolates a Mustache tag, for
example, {{message.text}},
it creates data binding between the output and the data. It will replace the
tag with the actual value and update the output whenever the text property has been changed. The text
interpolation also supports JavaScript expression. For example, you can make
the text property
always in lower case with {{message.text.toLowerCase()}}.11, we use another built-in directive, v-on, to attach an event listener to the
form’s submitevent.prevent is a modifier, telling Vue.js to
call event.preventDefault() so that the browser won’t actually submit the form. addMessage is a method that will be invoked
when the form’s submit event is triggered. We will create this method
shortly. You can use v-on to attach listeners to all of the normal DOM
events, for example, click and mouseover. You can also use it to listen to custom events
of Vue’s custom components in the same way. We will see how that works shortly.12, we use the built-inv-model directive to create a two-way
binding between the textarea element and newMessage property of the data object. In this way, whenever the
value of the textarea element is changed, the newMessage will be updated automatically. And
when newMessage is
changed, textarea will
be updated accordingly. This is such a nice feature that you can get the value
of the textarea element
without touching it yourself specifically. It works just as you would
imagine it should.14, we add a button with type="submit" to trigger the submit event of the form. Now, let’s create
our addMessage method
to listen to that event. We can do it by using the methods property of the options object.options object appears with the addMessage method:
methods property of the options object takes an object, where you put all of your methods. And inside these methods, you have access to the properties of the data object via this, as you can see that we use this.newMessage and this.messages inside the addMessage method to access them. The method syntax we use here is ES6, but you can also use function expression, as follows:
this.addMessage method, we add the new message to
the messages array
using the push() method,
and then we reset the newMessage property. Accordingly, Vue.js will clear textarea in the UI automatically. This
is the magic of two-way binding, which will be revealed soon.
@click, the short-hand of v-on:click, to attach the listener deleteMessage method to the click event. Instead of putting the method’s name here, we use an inline statement to pass the message object to the method. And here are the updated methods of the options object:
messages array using the Array.prototype.splice() method. Vue.js will detect this
change and update the DOM automatically. You don’t need to manipulate the DOM
at all.add feature. Let’s say we want to disable the Add button when there are 10 messages in the list. To do that, we can use the built-in v-bind directive to bind the Add button’s disabled attribute with the messages.length >= 10 expression. In this way, Vue.js will update the disabled attribute automatically when the length of the messages array changes. Here is the updated template:
Add button is disabled when the length of
the textarea input
exceeds 50 characters? You will need to change the value of the v-bind directive to newMessage.length
> 50. What if we
want to disable the button when there are already 10 messages, or the length of newMessage exceeds 50 characters? We can change the
directive value to messages.length >= 10 ||
newMessage.length > 50. It still works. However, as you can see, the code starts to bloat and it
would become hard to maintain when you need to add more logic to
decide when the Add button should be disabled.computed properties. As the name suggests, the value of such a property is computed rather than defined as those in the data object. And Vue.js will track the dependencies of a computed property and update the property’s value when the dependencies change. Let’s add the computed property addDisabled to the options object:
addDisabled computed property is defined as a method of the computed object of the options object. Inside the method, you also have access to the Vue instance via this. For the v-bind directive, there is also a shorthand option, which is a colon (:). Let’s update the Add button in the template to the following:
v-bind directive, you can use
it to bind the HTML element’s built-in attributes, for example, class and style. You can also use it to bind a Vue’s custom
component property. We will see how that works shortly.<script type="module">, you can open index.html directly using Chrome. If you try it now, you will see something strange. Immediately after opening the file, you can see the template markups that we put inside the mounting point, v-cloak directive to the mounting point and inserting a CSS rule to hide the template markups. Vue.js will remove the v-clock directive when the generated DOM is ready. The following are the updates to the index.html file:
[v-cloak] CSS rule, we add a few other rules
to style the UI a little bit, even though it is still very primitive with these
rules. Now, if you open it again in the browser, there is no flash anymore. data object, the computed object, and the methods object of the options object of a Vue instance. And you
can see that, even though the properties of these objects are defined
separately, you can access them in the same way, which is via this. Console tab
of Chrome’s Developer tools. Instead of using the input field in the UI, let’s
add a new message from the console by interacting directly with
the vm object,
which is the root Vue instance that we created and made available in the global
scope. As you can see from the following screenshot, it works as you would
expect. This is its simplicity and powerfulness:
The Messages App in Chrome data, computed, and methods properties, the options object has many other properties
that you can use to define a Vue instance. Components in Blazor
Creating a component in Blazor
Using a single file
.cshtml extension to create our component. To create a
component file, right-click on the Pages folder of your BlazorDemo project and
select New File. Type
in the filename as CompDemo.cshtml and press Enter to create the file.
@functions section are defined in only one file, that is, CompDemo.cshtml. Here, we have defined a PageTitleproperty to set the title on the page. On execution, this page will show a heading and a sample message, as defined in this property. But before running this application, we need to add the navigation link to this page to the \Shared\NavMenu.cshtml file. Open the \Shared\NavMenu.cshtml file and add the following code to it:
Comp Demo navigation
menu item, which will redirect to the CompDemo.cshtml page when clicked.dotnet run command into the VS Code console and
press Enter. Open the URL in the browser, and you should see a page similar to one
shown in the following screenshot:
Comp Demo link in the navigation menu on the left.
Click on it to navigate to the CompDemo.cshtml component. It should open a page
like the one shown in the following screenshot:
/singlepagecomp attached to it, and that the message
is being displayed on the page as we defined it in our component.Using a code-behind file
CodeBehindComp.cshtml and press Enter to create the file. This file will
contain the HTML section of our component. Similarly, add one more file, CodeBehindComp.cshtml.cs, to the Pages folder. This file will
contain our logic section, which will define the members of the component
class.CodeBehindComp.cshtml.cs and put the following code into it:
CodeBehindCompModel class that contains a PageTitle string property, which sets the title of the
component once it is rendered as a web page in the browser.CodeBehindComp.cshtml and put the following code into it:
@inherits directive. This allows us to use all
of the properties and methods defined in the class from this page.\Shared\NavMenu.cshtml file:
dotnet run command, and click on the Code Behind Comp link in the navigation menu on the
left. You should see a page similar to the one shown in the following screenshot:
Component Demo because of the PageTitle
variable defined in the code-behind file, whereas the messages is displayed
using the HTML defined in the .cshtml file.Using a component within another component
ParentComp.cshtml and ChildComp.cshtml.ChildComp.cshtml page and put the following code into it:
<div> tag. We will use a RenderFragment property, ChildContent, to hold the message supplied by the
parent component. ChildContent is a component parameter decorated
by the [Parameter] attribute. RenderFragment is defined in the application
metadata, and represents a segment of the UI content, implemented as a delegate
that writes the content to an instance of Microsoft.AspNetCore.Blazor.RenderTree.RenderTreeBuilder.RenderFragment content must be named ChildContentParentComp.cshtml and enter the following code:
/ParentComponent. To refer to the child component, we use
a tag with the same name as the file name of the child component, which
is <ChildComp>in
this case. The RenderFragment parameter is provided between the
tags of the child component. In this case, we provide a string message that
will be rendered by the child component.\Shared\NavMenu.cshtml file:
Parent-Child link in the navigation menu. You
should see a page similar to the following screenshot:
Understanding React Pure Components
![]()
Building your React application
src/App.js and save to reload.


Using Modules in Node.js
The Module System
Application Modularization
Module Categories
Built-In Modules
npm – Third-Party Module Registry
Scanning for node_modules
Handy npm Commands
Local Modules
Activity: Running Basic Node.js Code
Activity: Using a Third-Party Package