Working with CDI Bean in Java
Creating your CDI bean
A CDI bean is an application component that encapsulates some business logic. Beans can be used either by a Java code or by the unified EL (expression language used in JSP and JSF technologies). The beans’ life cycles are managed by the container and can be injected into other beans. To define a bean, all you need to do is to write a POJO and declare it to be a CDI bean. To declare this, there are two primary approaches:
- Using annotations
- Using the xml file
Both ways should work; however, folks prefer using annotations over XML as it’s handy and included in the actual coding context. So, why is XML still there? Well, that’s because annotations are relatively new in Java (released in Java 5). Until they were introduced, there was no other way in Java other than XML to provide configuration information to the application server. And since then, it continued to be just another way, alongside the annotations approach.
Moreover, if both are used together, XML is going to override annotations. Some developers and application administrators tend to perform temporary changes or hot-fixes at times, by overriding some hard-coded programmatic configuration values, using external XML files. It’s worth mentioning that this approach is not a recommended way to actually deploy things into your production.
In this article, you’ll use the annotations approach. Now, start by defining your first CDI bean:
First CDI bean
Perform the below steps:
- Defining a CDIbean – Start the first step by creating a new Java class with the name MyPojo, and then write the following code:
|
1 2 3 4 5 6 7 8 9 10 11 |
@Dependent public class MyPojo public String getMessage() { return "Hello from MyPojo !"; } } |
This bean is nothing more than a plain old Java object, annotated with the @Dependent annotation. This annotation declares that your POJO is a CDI component, which is called the dependent scope. The dependent scope tells the CDI context that whenever you request an injection to this bean, a new instance will be created.
- Now, inject your baby CDIbean into another component. Use a servlet as an example to this. Create a servlet named ExampleServlet and write the following code:
|
1 2 3 4 5 6 7 8 9 10 11 12 13 14 15 16 17 18 19 20 21 22 23 24 25 |
@WebServlet(urlPatterns = "/cdi-example-1") public class ExampleServlet extends HttpServlet { @Inject private MyPojo myPojo; @Override protected void doGet(HttpServletRequest req, HttpServletResponse resp) throws ServletException, IOException { resp.getOutputStream().println(myPojo.getMessage()); } } |
You have used the @Inject annotation to obtain an instance to the MyPojo class. Now run the application and visit http://localhost:8080/EnterpriseApplication1-war/cdi-example-1. You should see a page with the following text:
|
1 |
Hello from MyPojo ! |
Congratulations! You have created and used your first CDI bean.
Providing alternative implementations to your bean
One of the greatest features of CDI is that you can provide two or more different implementations to the same bean. This is very useful if you wish to do one of the following:
- Handling client-specific business logic that is determined at runtime; for example, providing different payment mechanisms for a purchase transaction
- Supporting different versions for different deployment scenarios; for example, providing an implementation that handles taxes in the USA and another one for Europe
- Easier management for test-driven development; for example, you can provide a primary implementation for production and another mocked one for testing
To do this, you should first rewrite your bean as an abstract element (abstract class or interface) to provide different implementations according to the basic OOP principles. Now rewrite your bean to be an interface as follows:
|
1 2 3 4 5 |
public interface MyPojo { String getMessage(); } |
Create an implementation class to your new interface:
|
1 2 3 4 5 6 7 8 9 10 11 12 13 14 15 |
@Dependent public class MyPojoImp implements MyPojo{ @Override public String getMessage() { return "Hello CDI 2.0 from MyPojoImp"; } } |
Now, without any modifications to the servlet class, you can test re-run your example; it should give the following output:
|
1 |
Hello from MyPojoImp ! |
What happened at runtime? The container received your request to inject a MyPojo instance. Since the container has detected your annotation over an interface and not a class stuffed with an actual implementation, it has started looking for a concrete class that implements this interface. After this, the container has detected the MyPojoImp class that satisfies this criterion. Therefore, it has instantiated and injected it for you.
Now provide different implementations. For this, you’ll need to create a new class that implements the MyPojo interface. Create a class called AnotherPojoImp as follows:
|
1 2 3 4 5 6 7 8 9 10 11 12 13 14 15 |
@Dependent public class AnotherPojoImp implements MyPojo{ @Override public String getMessage() { return "Hello CDI 2.0 from AnotherPojoImp"; } } |
Seems simple, right? But if you checked your servlet code again and if you were in the container shoes, how would you be able to determine which implementation should be injected at runtime? If you tried to run the previous example, you will end up with the following exception:
|
1 |
Ambiguous dependencies for type MyPojo with qualifiers @Default |
You have an ambiguity here, and there should be some meaning to specify which implementation version should be used at runtime. In CDI, this is achieved using qualifiers.
Using qualifiers
A qualifier is a user-defined annotation that is used to tell the container which version of the bean implementation you wish to use at runtime. The idea of qualifiers is too simple; you define a qualifier, and then you annotate both the bean and injection point with this qualifier.
Now define your first qualifier for the newly created bean implementation and create a new annotation with the following code:
|
1 2 3 4 5 6 7 8 9 10 11 |
@Qualifier @Retention(RUNTIME) @Target({TYPE, METHOD, FIELD, PARAMETER}) public @interface AnotherImp { } |
As you see, the qualifier is a custom-defined annotation, which itself is annotated with the @Qualifier annotation. @Qualifier tells the container that this annotation will act as a qualifier, while @Retention(RUNTIME) tells the JVM that this annotation should be available for reflection use at runtime. This way the container can check for this annotation at runtime. @Target{TYPE, METHOD, FIELD, PARAMETER} tells the compiler that this annotation can be used on types, methods, fields, and parameters. Note that the @Qualifier annotation is the key annotation here.
Here is the summary of the annotations to make it clearer:
| Annotation | Description |
| @Qualifier | Tells CDI that this annotation is going to be used to distinguish between different implementations to the same interface. |
| @Retention(RUNTIME) | Tells JVM that this annotation is intended to be used at runtime. Required for qualifiers. |
| @Target({TYPE, METHOD, FIELD, PARAMETER}) | Tells JVM that this annotation can be used on the mentioned syntax elements. |
Now, add the @AnotherImp annotation to AnotherPojoImp as follows:
|
1 2 3 4 5 6 7 8 9 10 11 12 13 14 15 16 17 |
@Dependent @AnotherImp public class AnotherPojoImp implements MyPojo{ @Override public String getMessage() { return "Hello from AnotherPojoImp"; } } |
The annotation’s role here is that it tells the container that this version of the class is called AnotherImp. Now you can reference this version by modifying the servlet as follows:
|
1 2 3 4 5 6 7 8 9 10 11 12 13 14 15 |
@WebServlet(urlPatterns = "/cdi-example") public class ExampleServlet extends HttpServlet { @Inject @AnotherImp private MyPojo myPojo; ... } |
With Example
|
1 |
Hello from AnotherPojoImp |
But how can you reference the original implementation MyPojoImp? There are two options available to do this:
- Defining another qualifier for MyPojoImp, like the earlier example
- Using the default qualifier
The default qualifier, as the name suggests, is the default one for any CDI bean that has not been explicitly qualified. Although an explicit declaration for the default qualifier is considered redundant and useless, it’s possible to explicitly declare your CDI bean as a default one using the @Default annotation, as shown in the following revision to the MyPojoImp class:
|
1 2 3 4 5 6 7 8 9 |
@Default @Dependent public class MyPojoImp implements MyPojo{ ... } |
Again, @Default is redundant, but you should consider its existence even if you have not explicitly declared it. Now, to reference the MyPojoImp from the servlet, rewrite it as follows:
|
1 2 3 4 5 6 7 8 9 10 11 12 13 14 15 |
@WebServlet(urlPatterns = "/cdi-example") public class ExampleServlet extends HttpServlet { @Inject @Default private MyPojo myPojo; ... } |
This way, the original MyPojoImp implementation will be injected instead. And likewise, you can eliminate the @Default annotation, as the default implementation will be used by default!
If you found this article interesting, you can explore Abdalla Mahmoud’s Developing Middleware in Java EE 8 to use Java features such as JAX-RS, EJBs, and JPAs for building powerful middleware for newer architectures such as the cloud. This book can help you become an expert in developing middleware for a variety of applications.
Building an Event-Driven Reactive Asynchronous System with Spring Boot and Kafka
Building an event-driven Reactive Asynchronous System
Spring Boot provides a new strategy for application development with the Spring Framework. It enables you to focus only on the application’s functionality rather than on Spring meta configuration, as Spring Boot requires minimal to zero configuration in the Spring application.
This article will show you how to build a sample project that demonstrates how to create a real-time streaming application using event-driven architecture, Spring Cloud Stream, Spring Boot, Apache Kafka, and Spring Netflix Eureka.
Architecture

Here, Netflix Hystrix has been used to implement the circuit breaker pattern and the API Gateway proxy has been configured using Netflix Zuul.
To get started, create an application with three microservices: Account, Customer, and Notification. Whenever you create a customer record or create an account for a customer, a notification service sends an email and a mobile notification.
All three decoupled services—Account, Customer, and Notification—are independently deployable applications. The Account service can be used to create, read, update, and delete customer accounts. It also sends a message to the Kafka topic when a new account is created.
Similarly, the Customer service is used to create, read, update, and delete a customer in the database. It sends a message to the Kafka topic when a new customer is created, and the Notification service sends email and SMS notifications. The Notification service listens on topics from incoming customer and account messages and then processes these messages by sending notifications to the given email and mobile.
The Account and Customer microservices have their own H2 database, and the Notification service uses MongoDB. In this application, you’ll use the Spring Cloud Stream module to provide abstract messaging mechanisms; it is a framework for building event-driven microservice applications.
This example also uses the edge service for API Gateway using Netflix Zuul. Zuul is a JVM-based router and is also used as server-side load balancer by Netflix. Spring has a strong bonding with Netflix Zuul and provides a Spring Cloud Netflix Zuul module.
Introducing Spring Cloud Streaming
Spring Cloud Stream is a framework for building message-driven microservice applications. It abstracts away the message producer and consumer code from message broker-specific implementations. Spring Cloud Stream provides input and output channels for servicing communications to the outside world. It provides the message broker’s connectivity to the Spring Cloud Stream. Message brokers, such as Kafka and RabbitMQ, can be easily added by injecting a binding dependency to the application code.
Here’s the Maven dependency for Spring Cloud Stream:
|
1 2 3 4 5 6 7 |
<dependency> <groupId>org.springframework.cloud</groupId> <artifactId>spring-cloud-stream-reactive</artifactId> </dependency> |
In the above Maven dependency, you have the Spring Cloud Stream dependency reactive model. Now to enable the application to connect with the message broker, use the following code:
|
1 2 3 4 5 |
@EnableBinding(NotificationStreams.class) public class StreamsConfig { } |
Here, the @EnableBinding annotation is used to enable connectivity between the application and message broker. This annotation takes one or more interfaces as parameters; in this case, you have passed the NotificationStreams interface as a parameter:
|
1 2 3 4 5 6 7 8 9 10 11 12 13 14 15 |
public interface NotificationStreams { String INPUT = "notification-in"; String OUTPUT = "notification-out"; @Input(INPUT) SubscribableChannel subscribe(); @Output(OUTPUT) MessageChannel notifyTo(); } |
As you can see, the interface declares input and/or output channels. This is your custom interface in this example, but you can also use other interfaces provided by Spring Cloud Stream:
- Source: This interface can be used for an application that has a single outbound channel
- Sink: This interface can be used for an application that has a single inbound channel
- Processor: This interface can be used for an application that has both an inbound and an outbound channel
In the preceding code, the @Input annotation is used to identify an input channel. Using this identifier, it receives a message, which enters the application. Similarly, the @Output annotation is used to identify an output channel; using this identifier, published messages leave the application.
The @Input and @Output annotations take the name parameter as a channel name; if a name is not provided, then the name of the annotated method will be used by default. In this application, Kafka is used as a message broker.
Adding Kafka to your application
Apache Kafka is a publish-subscribe-based high-performance and horizontally scalable messaging platform. Developed by LinkedIn, it is fast, scalable, and distributed by design. Spring Cloud Stream supports binder implementations for Kafka and RabbitMQ. First, you have to install Kafka in your machine.
Installing and running Kafka
Download Kafka from https://kafka.apache.org/downloads and untar it using the following commands:
|
1 2 3 |
> tar -xzf kafka_2.12-1.1.0.tgz > cd kafka_2.12-1.1.0 |
Now start ZooKeeper and Kafka on Windows:
|
1 2 3 |
> bin\windows\zookeeper-server-start.bat configzookeeper.properties > bin\windows\kafka-server-start.bat configserver.properties |
You can start ZooKeeper and Kafka on Linux using the following commands:
|
1 2 3 |
> bin/zookeeper-server-start.sh config/zookeeper.properties > bin/kafka-server-start.sh config/server.properties |
After starting Kafka on your machine, add the Kafka Maven dependency in your application:
|
1 2 3 4 5 6 7 8 9 10 11 12 13 14 15 |
<dependency> <groupId>org.springframework.cloud</groupId> <artifactId>spring-cloud-stream-binder-kafka</artifactId> </dependency> <dependency> <groupId>org.springframework.cloud</groupId> <artifactId>spring-cloud-stream-binder-kafka-streams</artifactId> </dependency> |
Here, Spring Cloud Stream and Kafka binder is already added. After adding these dependencies, set the configuration properties for Kafka.
Configuration properties for Kafka
Here is the application.yml configuration file for a microservice:
|
1 2 3 4 5 6 7 8 9 10 11 12 13 14 15 16 17 18 19 20 21 22 23 24 25 26 27 28 29 30 31 |
spring: application: name: customer-service cloud: stream: kafka: binder: brokers: - localhost:9092 bindings: notification-in: destination: notification contentType: application/json notification-out: destination: notification contentType: application/json |
This file configures the address of the Kafka server to connect to, and the Kafka topic used for both the inbound and outbound streams in your code. The contentType properties tell Spring Cloud Stream to send or receive your message objects as strings in the streams.
Service used to write to Kafka
The following service class is responsible for writing to Kafka in your application:
|
1 2 3 4 5 6 7 8 9 10 11 12 13 14 15 16 17 18 19 20 21 22 23 24 25 26 27 28 29 30 31 |
@Servicepublic class NotificationService { private final NotificationStreams notificationStreams; public NotificationService(NotificationStreams notificationStreams) { super(); this.notificationStreams = notificationStreams; } public void sendNotification(final Notification notification) { MessageChannel messageChannel = notificationStreams.notifyTo(); messageChannel.send(MessageBuilder.withPayload(notification) .setHeader(MessageHeaders.CONTENT_TYPE, MimeTypeUtils.APPLICATION_JSON) .build()); } } |
The sentNotification() method uses an injected NotificationStreams object to send messages represented by the Notification object in your application. Now look at the following Controller class, which will trigger sending the message to Kafka.
Rest API controller
Here’s a Rest Controller class that you can use to create a REST API endpoint. This controller will trigger sending a message to Kafka using the NotificationService Spring Bean:
|
1 2 3 4 5 6 7 8 9 10 11 12 13 14 15 16 17 18 19 20 21 22 23 24 25 26 27 28 29 30 31 32 33 34 35 |
@RestController public class CustomerController { ... @Autowired CustomerRepository customerRepository; @Autowired AccountService accountService; @Autowired NotificationService notificationService; @PostMapping(value = "/customer") public Customer save (@RequestBody Customer customer){ Notification notification = new Notification("Customer is created", "admin@dineshonjava.com", "9852XXX122"); notificationService.sendNotification(notification); return customerRepository.save(customer); } ... ... } |
The preceding Controller class of Customer service has a dependency with NotificationService. The save() method is responsible for creating a customer in the corresponding database; it creates a notification message using the Notification object and sends it to Kafka using the sendNotification() method of NotificationService. Here’s another side of how Kafka listens to this message using the topic name notification.
Listening to a Kafka topic
Create a listener NotificationListener class that will be used to listen to messages on the Kafka notification topic and send email and SMS notifications to the customer:
|
1 2 3 4 5 6 7 8 9 10 11 12 13 14 15 16 17 18 19 20 21 |
@Component public class NotificationListener { @StreamListener(NotificationStreams.INPUT) public void sendMailNotification(@Payload Notification notification) { System.out.println("Sent notification to email: "+notification.getEmail()+" Message: "+notification.getMessage()); } @StreamListener(NotificationStreams.INPUT) public void sendSMSNotification(@Payload Notification notification) { System.out.println("Notified with SMS to mobile: "+notification.getMobile()+" Message: "+notification.getMessage()); } } |
The NotificationListener class has two methods: sendMailNotification() and sendSMSNotification(). These methods will be invoked by Spring Cloud Stream with every new Notification message object on the Kafka notification topic. These methods are annotated with @StreamListener. This annotation makes the method listener receive events for stream processing.
This article doesn’t have the complete code for this event-driven application; you can find the complete code in the GitHub repository at https://github.com/PacktPublishing/Mastering-Spring-Boot-2.0.
Now run this application to test how the event-driven microservice works. First, ensure that you run Kafka and Zookeeper. The Kafka server will be run at http://localhost:9092.
Now run EurekaServer, ApiZuulService, AccountService, CustomerService, and NotificationService. Open Eureka dashboard on the browser:

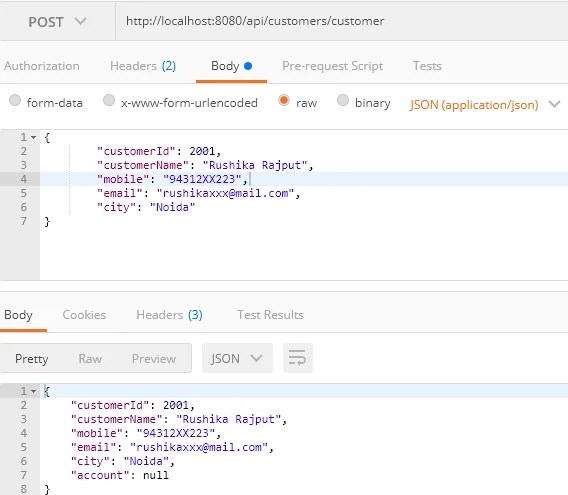
All services are running now; create a Customer object to trigger the event to Kafka. Here, Postman is used as a REST client. See the following diagram, where you created a new customer using the http://localhost:8080/api/customers/customer API endpoint through Zuul API Gateway:

You have entered a new customer record in the database. Whenever a new customer is created, it will trigger a message to Kafka to send email and SMS notifications using the Notification microservice. See the following console output of the Notification microservice:

You have created a new customer using the Customer service, which will trigger a notification to be sent to the customer using the Kafka broker. It is a message-driven asynchronous call. Similarly, whenever you create an account record for a new customer, Kafka will listen for another new notification message for the account creation:
Now verify the console of the Notification microservice:

You have successfully created an account record for the customer, which has triggered a message to Kafka to send email and SMS notifications to the customer. You can check the customer record for this customer by visiting http://localhost:8080/api/customers/customer/2001:

As you can see, the customer has complete information including an associated account object.
You’ve now learned to create an event-driven microservice using the Spring Cloud Stream, Kafka Event Bus, Spring Netflix Zuul, and Spring Discovery services.
If you found this article interesting, you can explore Dinesh Rajput’s Mastering Spring Boot 2.0 to learn how to develop, test, and deploy your Spring Boot distributed application and explore various best practices. This book will address challenges related to power that come with Spring Boot’s great configurability and flexibility.